[2022.01.18(화)] - 모각코 5회
1. 학습목표
- flutter와 firebase를 사용하여 데이터를 동기화하여 관리한다.
2. 학습내용
https://firebase.google.com/codelabs/firebase-get-to-know-flutter#0
flutter 공식 사이트 문서에 있는 codelabs 중 'Get to know Firebase for flutter'를 따라하며 flutter와 firebase를 연동하고 firestore을 사용하여 데이터를 동기화 해 보았다.
아래는 firebase를 flutter에 연결한 후 사용자가 로그인을 할 수 있는 코드이다.
import 'package:firebase_auth/firebase_auth.dart';
import 'package:firebase_core/firebase_core.dart';
import 'package:flutter/material.dart';
import 'package:google_fonts/google_fonts.dart';
import 'package:provider/provider.dart';
import 'firebase_options.dart';
import 'src/authentication.dart';
import 'src/widgets.dart';
void main() {
runApp(
ChangeNotifierProvider(
create: (context) => ApplicationState(),
builder: (context, _) => App(),
),
);
}
class App extends StatelessWidget {
@override
Widget build(BuildContext context) {
return MaterialApp(
title: 'Firebase Meetup',
theme: ThemeData(
buttonTheme: Theme.of(context).buttonTheme.copyWith(
highlightColor: Colors.deepPurple,
),
primarySwatch: Colors.deepPurple,
textTheme: GoogleFonts.robotoTextTheme(
Theme.of(context).textTheme,
),
visualDensity: VisualDensity.adaptivePlatformDensity,
),
home: const HomePage(),
);
}
}
class HomePage extends StatelessWidget {
const HomePage({Key? key}) : super(key: key);
@override
Widget build(BuildContext context) {
return Scaffold(
appBar: AppBar(
title: const Text('Firebase Meetup'),
),
body: ListView(
children: <Widget>[
Image.asset('assets/codelab.png'),
const SizedBox(height: 8),
const IconAndDetail(Icons.calendar_today, 'October 30'),
const IconAndDetail(Icons.location_city, 'San Francisco'),
Consumer<ApplicationState>(
builder: (context, appState, _) => Authentication(
email: appState.email,
loginState: appState.loginState,
startLoginFlow: appState.startLoginFlow,
verifyEmail: appState.verifyEmail,
signInWithEmailAndPassword: appState.signInWithEmailAndPassword,
cancelRegistration: appState.cancelRegistration,
registerAccount: appState.registerAccount,
signOut: appState.signOut,
),
),
const Divider(
height: 8,
thickness: 1,
indent: 8,
endIndent: 8,
color: Colors.grey,
),
const Header("What we'll be doing"),
const Paragraph(
'Join us for a day full of Firebase Workshops and Pizza!',
),
],
),
);
}
}
class ApplicationState extends ChangeNotifier {
ApplicationState() {
init();
}
Future<void> init() async {
await Firebase.initializeApp(
options: DefaultFirebaseOptions.currentPlatform,
);
FirebaseAuth.instance.userChanges().listen((user) {
if (user != null) {
_loginState = ApplicationLoginState.loggedIn;
} else {
_loginState = ApplicationLoginState.loggedOut;
}
notifyListeners();
});
}
ApplicationLoginState _loginState = ApplicationLoginState.loggedOut;
ApplicationLoginState get loginState => _loginState;
String? _email;
String? get email => _email;
void startLoginFlow() {
_loginState = ApplicationLoginState.emailAddress;
notifyListeners();
}
Future<void> verifyEmail(
String email,
void Function(FirebaseAuthException e) errorCallback,
) async {
try {
var methods =
await FirebaseAuth.instance.fetchSignInMethodsForEmail(email);
if (methods.contains('password')) {
_loginState = ApplicationLoginState.password;
} else {
_loginState = ApplicationLoginState.register;
}
_email = email;
notifyListeners();
} on FirebaseAuthException catch (e) {
errorCallback(e);
}
}
Future<void> signInWithEmailAndPassword(
String email,
String password,
void Function(FirebaseAuthException e) errorCallback,
) async {
try {
await FirebaseAuth.instance.signInWithEmailAndPassword(
email: email,
password: password,
);
} on FirebaseAuthException catch (e) {
errorCallback(e);
}
}
void cancelRegistration() {
_loginState = ApplicationLoginState.emailAddress;
notifyListeners();
}
Future<void> registerAccount(
String email,
String displayName,
String password,
void Function(FirebaseAuthException e) errorCallback) async {
try {
var credential = await FirebaseAuth.instance
.createUserWithEmailAndPassword(email: email, password: password);
await credential.user!.updateDisplayName(displayName);
} on FirebaseAuthException catch (e) {
errorCallback(e);
}
}
void signOut() {
FirebaseAuth.instance.signOut();
}
}

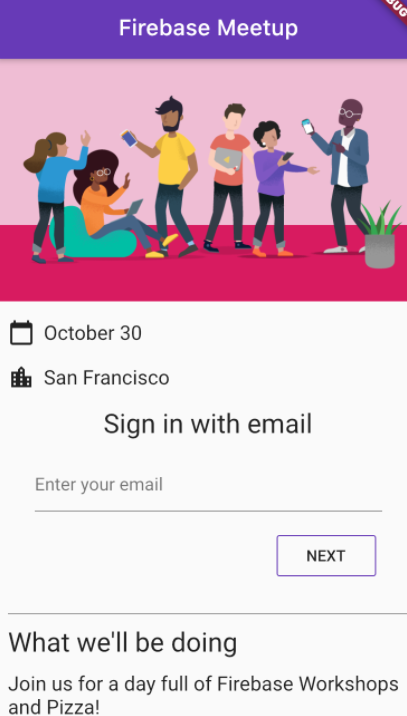
RSVP 버튼을 클릭하여 사용자를 등록할 수 있다.

3. 후기
firebase에서 새 프로젝트를 생성하고, flutter에서 여러 명령을 실행하고 firebase와 연결하는 과정이 어려웠다. 연결하는 과정에서 많이 헤맸기 때문에 처음 연결이 성공적으로 되었을 때 굉장히 기쁘고 후련했다. flutter에서 코드를 실행하여 등록한 사용자가 바로 firebase에 저장되는 모습이 신기했하고 재미있었다.